Showing posts with label PC tricks. Show all posts

How to Convert FAT partiton to NTFS Partition without losing data


How to Convert FAT partiton to NTFS Partition without losing data
*.NTFS(NT File System) is the standard file sytem for Microsoft¡¯s Windows XP and Windows Vista operating systems.NTFS file system provides more stability, security and less fragmentation than previous FAT(File Allocation Table) file system used in operating systems like MS-DOS,Windows 98,Windows ME etc.
*.NTFS is the recommended file system for Windows XP and Windows Vista operating systems because it¡¯s is more powerful than FAT or FAT32 file systems used in former Windows OS¡¯s, and includes features required for hosting Active Directory as well as other important security features.Windows Vista needed NTFS file system in order to install and we can¡¯t install Windows Vista on a FAT partition.
*.Converting a partition from FAT or FAT32 to NTFS can be done by an inbuilt utility(convert.exe) in the Windows XP operating system.So if you want increased security and faster data encryption,go ahead and convert to NTFS.


How to Convert FAT partiton to NTFS Partition without losing data
*.NTFS(NT File System) is the standard file sytem for Microsoft¡¯s Windows XP and Windows Vista operating systems.NTFS file system provides more stability, security and less fragmentation than previous FAT(File Allocation Table) file system used in operating systems like MS-DOS,Windows 98,Windows ME etc.
*.NTFS is the recommended file system for Windows XP and Windows Vista operating systems because it¡¯s is more powerful than FAT or FAT32 file systems used in former Windows OS¡¯s, and includes features required for hosting Active Directory as well as other important security features.Windows Vista needed NTFS file system in order to install and we can¡¯t install Windows Vista on a FAT partition.
*.Converting a partition from FAT or FAT32 to NTFS can be done by an inbuilt utility(convert.exe) in the Windows XP operating system.So if you want increased security and faster data encryption,go ahead and convert to NTFS.

how to hack windows 7 admin password


Hey Guys..today,i m posting my brand new hack of admin/user paswrd in windows7. This works 1000%.Anyway i ll try 2 present it as simple as posible. Step wise instruction wid SCREENSHOT . Folo it prprly and try at ur own risk!!! : --
1. First of all, you must have a bootable Ubuntu OS CD or DVD or a USB flash drive. If you dont have it, you can download it from http://www.ubuntu.com and burn it to a CD or DVD or copy it on a USB flash drive by using UNetbootin software.This tool is available in several websites.But I have downloaded it from http://www.download.com and here is the direct download link 4 unbuntu :

Hey Guys..today,i m posting my brand new hack of admin/user paswrd in windows7. This works 1000%.Anyway i ll try 2 present it as simple as posible. Step wise instruction wid SCREENSHOT . Folo it prprly and try at ur own risk!!! : --
1. First of all, you must have a bootable Ubuntu OS CD or DVD or a USB flash drive. If you dont have it, you can download it from http://www.ubuntu.com and burn it to a CD or DVD or copy it on a USB flash drive by using UNetbootin software.This tool is available in several websites.But I have downloaded it from http://www.download.com and here is the direct download link 4 unbuntu :

Hack All nokia s60v5,Belle FP1,Belle FP2


Many User Get Certificate Error,Expired Certificate,Unable To Install Inbuilt Error Etc
So We have started to solve this problem many users r dnt how to hack ur s60v5 device..


Many User Get Certificate Error,Expired Certificate,Unable To Install Inbuilt Error Etc
So We have started to solve this problem many users r dnt how to hack ur s60v5 device..

Password Protect Any Folder Without Any Software


How To Lock Folder ?
   1. Open Notepad and Copy code given below into it.
cls
@ECHO OFF
title coolhacking-tricks.blogspot.com
if EXIST "Control Panel.{21EC2020-3AEA-1069-A2DD-08002B30309D}" goto UNLOCK
if NOT EXIST MyFolder goto MDMyFolder
:CONFIRM
echo Are you sure to lock this folder? (Y/N)
set/p "cho=>"
if %cho%==Y goto LOCK
if %cho%==y goto LOCK
if %cho%==n goto END
if %cho%==N goto END
echo Invalid choice.
goto CONFIRM
:LOCK
ren MyFolder "Control Panel.{21EC2020-3AEA-1069-A2DD-08002B30309D}"
attrib +h +s "Control Panel.{21EC2020-3AEA-1069-A2DD-08002B30309D}"
echo Folder locked
goto End
:UNLOCK
echo Enter password to Unlock Your Secure Folder
set/p "pass=>"
if NOT %pass%== coolhacks goto FAIL
attrib -h -s "Control Panel.{21EC2020-3AEA-1069-A2DD-08002B30309D}"
ren "Control Panel.{21EC2020-3AEA-1069-A2DD-08002B30309D}" MyFolder
echo Folder Unlocked successfully
goto End
:FAIL
echo Invalid password
goto end
:MDMyFolder
md MyFolder
echo MyFolder created successfully
goto End
:End

   2. Save the notepad file as lock.bat (.bat is must)
   3. Now double click on lock.bat and a new folder will be created with name MyFolder
   4. Copy all your data you want to protect in that New folder
   5. Now double click on lock.bat and when command promp appears Type Y and press enter.
   6. Now MyFolder will be hidden from you view, to access that folde double click on lock.bat
   7. It will ask for password enter your password and done. (Default password is coolhacks)
To change the password replace coolhacks with  new password in the above code


How To Further Secure ?

You might be thinking that anyone can access the password by opening that lock.bat file in Notepad or any other text editor. To make it more secure hide lock.bat in some secure location after following the above tutorial To access the secured file double click on lock.bat. I would suggest copying lock.bat file into Pendrive and copying it into your computer whenever you required to access to your protected files.

How To Lock Folder ?
   1. Open Notepad and Copy code given below into it.
cls
@ECHO OFF
title coolhacking-tricks.blogspot.com
if EXIST "Control Panel.{21EC2020-3AEA-1069-A2DD-08002B30309D}" goto UNLOCK
if NOT EXIST MyFolder goto MDMyFolder
:CONFIRM
echo Are you sure to lock this folder? (Y/N)
set/p "cho=>"
if %cho%==Y goto LOCK
if %cho%==y goto LOCK
if %cho%==n goto END
if %cho%==N goto END
echo Invalid choice.
goto CONFIRM
:LOCK
ren MyFolder "Control Panel.{21EC2020-3AEA-1069-A2DD-08002B30309D}"
attrib +h +s "Control Panel.{21EC2020-3AEA-1069-A2DD-08002B30309D}"
echo Folder locked
goto End
:UNLOCK
echo Enter password to Unlock Your Secure Folder
set/p "pass=>"
if NOT %pass%== coolhacks goto FAIL
attrib -h -s "Control Panel.{21EC2020-3AEA-1069-A2DD-08002B30309D}"
ren "Control Panel.{21EC2020-3AEA-1069-A2DD-08002B30309D}" MyFolder
echo Folder Unlocked successfully
goto End
:FAIL
echo Invalid password
goto end
:MDMyFolder
md MyFolder
echo MyFolder created successfully
goto End
:End

   2. Save the notepad file as lock.bat (.bat is must)
   3. Now double click on lock.bat and a new folder will be created with name MyFolder
   4. Copy all your data you want to protect in that New folder
   5. Now double click on lock.bat and when command promp appears Type Y and press enter.
   6. Now MyFolder will be hidden from you view, to access that folde double click on lock.bat
   7. It will ask for password enter your password and done. (Default password is coolhacks)
To change the password replace coolhacks with  new password in the above code


How To Further Secure ?

You might be thinking that anyone can access the password by opening that lock.bat file in Notepad or any other text editor. To make it more secure hide lock.bat in some secure location after following the above tutorial To access the secured file double click on lock.bat. I would suggest copying lock.bat file into Pendrive and copying it into your computer whenever you required to access to your protected files.

How to run Turbo c full screen in windows 7 without any software


I know u most aware with turbo c language.This compiler is easily full screened with XP.
But we can not use it in full screen in win 7 and win vista.
so we need software having name dosbox for that.but in this trick i will just give instruction how to make Turbo C in Full screen without any software

Steps :
Step 1 : go to c:/tc/bin and find tc.exe
Step 2 : Right click on tc.exe and go to properties
Step 3 : in the properties go to Screen Tab
Step 4 : in Screen tab u got option about Usage in that properties click on windows instead of Full screen.
Step 5 :after that run tc.exe, click ignore if ask (if not then do nothing) it will open it in normal small window.
Step 6 :right click on the border and go to properties.then move to fonts tab.
Step 7 : select lucida console and size 28


Enjoy


I know u most aware with turbo c language.This compiler is easily full screened with XP.
But we can not use it in full screen in win 7 and win vista.
so we need software having name dosbox for that.but in this trick i will just give instruction how to make Turbo C in Full screen without any software

Steps :
Step 1 : go to c:/tc/bin and find tc.exe
Step 2 : Right click on tc.exe and go to properties
Step 3 : in the properties go to Screen Tab
Step 4 : in Screen tab u got option about Usage in that properties click on windows instead of Full screen.
Step 5 :after that run tc.exe, click ignore if ask (if not then do nothing) it will open it in normal small window.
Step 6 :right click on the border and go to properties.then move to fonts tab.
Step 7 : select lucida console and size 28


Enjoy

Compress HD Videos Without Losing Quality


TUT :>
1. First of all you need to download a too called "HandBrake"
Download here
http://handbrake.fr/downloads.php
2. After downloading and installing you'll see the first window of it, which will look like this


 3. Now here you can easily operate this program, just click on "Source" button to select the source video file and after that in Destination section click on "Browse" button and assign the output video name and location.
4. You can also see the 30 second preview of your output video by clicking on "Preview" button.
5. After doing all the setting just click on "Start:" button and that's it

After the conversion of the video, I'm sure that you will be amazed by your video quality and size


TUT :>
1. First of all you need to download a too called "HandBrake"
Download here
http://handbrake.fr/downloads.php
2. After downloading and installing you'll see the first window of it, which will look like this


 3. Now here you can easily operate this program, just click on "Source" button to select the source video file and after that in Destination section click on "Browse" button and assign the output video name and location.
4. You can also see the 30 second preview of your output video by clicking on "Preview" button.
5. After doing all the setting just click on "Start:" button and that's it

After the conversion of the video, I'm sure that you will be amazed by your video quality and size

Remove Recent Documents in MS Office


People sometimes don’t want to keep their recent documents in history to be shown on their MS office. This is for the reason to protect their important documents from other's sight.

  What will be your reaction if I tell there is a way to remove the list of documents that you recently viewed from "Recent Documents"? Yes, Of course, there is a method.

Steps :>
Step 1 : Go to Microsoft Office Word, Click on Office Button
Step 2 : Click on "Word Options" from Office button menu.
Step 3 : When "Word Options" window opens, Click "Advanced".
Step 4 : In "Advanced Options for working with Word" scroll down and enter a value of "0" in "Display" under "Show this number of Recent Documents" and then press "OK" from bottom.
Step 5 : Now you can see that the list of document names which you viewed recently would be removed from"Recent Documents" list.


Finally, your important documents are safe!

People sometimes don’t want to keep their recent documents in history to be shown on their MS office. This is for the reason to protect their important documents from other's sight.

  What will be your reaction if I tell there is a way to remove the list of documents that you recently viewed from "Recent Documents"? Yes, Of course, there is a method.

Steps :>
Step 1 : Go to Microsoft Office Word, Click on Office Button
Step 2 : Click on "Word Options" from Office button menu.
Step 3 : When "Word Options" window opens, Click "Advanced".
Step 4 : In "Advanced Options for working with Word" scroll down and enter a value of "0" in "Display" under "Show this number of Recent Documents" and then press "OK" from bottom.
Step 5 : Now you can see that the list of document names which you viewed recently would be removed from"Recent Documents" list.


Finally, your important documents are safe!

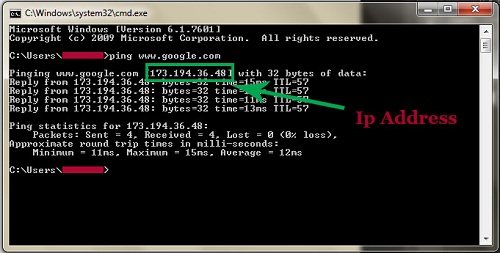
find IP Address of any website


Using IP Address you can find location of the website server and do more stuff. I will demostrate this tutorial with Google but you can use this method to find IP Address of any website like twitter, facebook etc. So lets get started.

1. Go to Start > Type CMD and press Enter.
2. Now write Ping followed by website URL whose IP you want to find.

3. It will take less then a second and come up with the results as shown below.


Using IP Address you can find location of the website server and do more stuff. I will demostrate this tutorial with Google but you can use this method to find IP Address of any website like twitter, facebook etc. So lets get started.

1. Go to Start > Type CMD and press Enter.
2. Now write Ping followed by website URL whose IP you want to find.

3. It will take less then a second and come up with the results as shown below.


Change your Ip address in less then 1 minute


In my previous post i had show you how to Grab someone ip address now i will show you how to change ip address in less then a minute. For now it will take 2 to 3 minutes but with some practice you can do this within a minute.


-->> Click on "Start" in the bottom left corner of the screen.
-->> Click on "RUN"
-->> Type in "command" and click OK


      You should be now at MSDOS prompt Screen

-->> Type "ipconfig /release" just like that, and press "enter"
-->> Type "exit" and leave the prompt
-->> Right-click on "Network Places" or "My Network Places" on your desktop.
-->> Click on "properties"


     Now you should  be on a screen with something titled "Local Area Connection", or something  similar to that, and, if you have a network hooked up, all of your other networks.

-->>Right click on "Local Area Connection" and click "properties"
-->>Double-click on the "Internet Protocol (TCP/IP)" from the list under the "General" tab
-->>Click on "Use the following IP address" under the "General" tab
-->>Create an IP address (It doesn't matter what it is)
-->>Press "Tab" and it should automatically fill in the "Subnet Mask" section with default numbers.
-->>Press the "Ok" button here
-->>Hit the "Ok" button again  

  Now you should be back to the "Local Area Connection" screen.

-->> Right-click back on "Local Area Connection" and go to properties again.
-->>Go back to the "TCP/IP" settings
-->>This time, select "Obtain an IP address automatically"
-->>Click on "Ok"
-->>Hit "Ok" again.
-->>Now you have a New IP address.


In my previous post i had show you how to Grab someone ip address now i will show you how to change ip address in less then a minute. For now it will take 2 to 3 minutes but with some practice you can do this within a minute.


-->> Click on "Start" in the bottom left corner of the screen.
-->> Click on "RUN"
-->> Type in "command" and click OK


      You should be now at MSDOS prompt Screen

-->> Type "ipconfig /release" just like that, and press "enter"
-->> Type "exit" and leave the prompt
-->> Right-click on "Network Places" or "My Network Places" on your desktop.
-->> Click on "properties"


     Now you should  be on a screen with something titled "Local Area Connection", or something  similar to that, and, if you have a network hooked up, all of your other networks.

-->>Right click on "Local Area Connection" and click "properties"
-->>Double-click on the "Internet Protocol (TCP/IP)" from the list under the "General" tab
-->>Click on "Use the following IP address" under the "General" tab
-->>Create an IP address (It doesn't matter what it is)
-->>Press "Tab" and it should automatically fill in the "Subnet Mask" section with default numbers.
-->>Press the "Ok" button here
-->>Hit the "Ok" button again  

  Now you should be back to the "Local Area Connection" screen.

-->> Right-click back on "Local Area Connection" and go to properties again.
-->>Go back to the "TCP/IP" settings
-->>This time, select "Obtain an IP address automatically"
-->>Click on "Ok"
-->>Hit "Ok" again.
-->>Now you have a New IP address.


Test- to Find whether you can run a PC game or not


Can I run it in My PC? Yes , this is the first question comes in my mind when I hear about a latest PC game.

So, the first thing you do is - check the system requirement of the Game and make sure your Pc fulfills the requirement. It's takes a lot of time when you do it manually.

So, In this Post I am giving you a tip to run a short test to check the system requirement of any game within a second. The process is very simple.

Steps :>
1.     Got to this link - Click here
2.    http://www.systemrequirementslab.com/cyri
2. Browse the latest game you are looking for and run a test. Within a few seconds you will get the result whether you pass the test or not. If you Pass it then your Pc is ready to play the Game. If you Fail the Game , then update your Pc and make it ready.


Can I run it in My PC? Yes , this is the first question comes in my mind when I hear about a latest PC game.

So, the first thing you do is - check the system requirement of the Game and make sure your Pc fulfills the requirement. It's takes a lot of time when you do it manually.

So, In this Post I am giving you a tip to run a short test to check the system requirement of any game within a second. The process is very simple.

Steps :>
1.     Got to this link - Click here
2.    http://www.systemrequirementslab.com/cyri
2. Browse the latest game you are looking for and run a test. Within a few seconds you will get the result whether you pass the test or not. If you Pass it then your Pc is ready to play the Game. If you Fail the Game , then update your Pc and make it ready.


How to disable delete confirmation dialog box in Windows 7


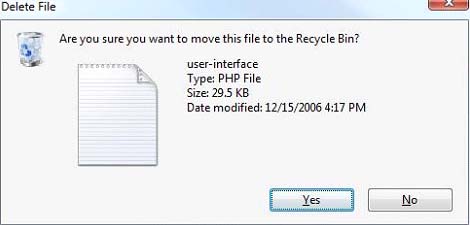
The feature of Windows asking you if you really want to put the files in the Recycle Bin whenever you attempt to delete a file is to stop you from deleting a file by mistake or accident. The delete confirmation dialog box appears every time you give the command of deleting a file. However, there are times you are deleting many unnecessary files in order to clean up your hard drive. This delete confirmation dialog box will really bother you at such times and you would want to get rid of it as it takes up a lot of your time while you are deleting numerous files.

    There is an easy way to disable delete confirmation dialog box in Windows 7. As you disable delete confirmation dialog box in Windows 7, you will be able to save a lot of your time. However, it is recommended that you do not disable delete confirmation dialog box in Windows 7 unless really necessary. You should turn it back on after you are done with your cleaning up of the computer.


Follow these easy steps to disable delete confirmation dialog box in Windows 7.
    Right-click on the Recycle Bin icon on the desktop.
    Select Properties from the resulting menu.


The Recycle Bin Properties dialog box will appear. Uncheck the Display delete confirmation dialog box at the bottom.


    Click on the Apply and then the Ok button.

    You have been successful to disable delete confirmation dialog box in Windows 7. The method to turn it on again is very simple too. Just follow the above steps and check the Display delete confirmation dialog box.

The feature of Windows asking you if you really want to put the files in the Recycle Bin whenever you attempt to delete a file is to stop you from deleting a file by mistake or accident. The delete confirmation dialog box appears every time you give the command of deleting a file. However, there are times you are deleting many unnecessary files in order to clean up your hard drive. This delete confirmation dialog box will really bother you at such times and you would want to get rid of it as it takes up a lot of your time while you are deleting numerous files.

    There is an easy way to disable delete confirmation dialog box in Windows 7. As you disable delete confirmation dialog box in Windows 7, you will be able to save a lot of your time. However, it is recommended that you do not disable delete confirmation dialog box in Windows 7 unless really necessary. You should turn it back on after you are done with your cleaning up of the computer.


Follow these easy steps to disable delete confirmation dialog box in Windows 7.
    Right-click on the Recycle Bin icon on the desktop.
    Select Properties from the resulting menu.


The Recycle Bin Properties dialog box will appear. Uncheck the Display delete confirmation dialog box at the bottom.


    Click on the Apply and then the Ok button.

    You have been successful to disable delete confirmation dialog box in Windows 7. The method to turn it on again is very simple too. Just follow the above steps and check the Display delete confirmation dialog box.

List Of Some Important RUN Command


If you known "cmd" and tried typing it on the run window, you might want to explore and use other commands for your computer.


If you known "cmd" and tried typing it on the run window, you might want to explore and use other commands for your computer.

How to disable search history display in Windows 7


Windows 7 automatically saves all the recent searches done by the users. Some people are annoyed by this feature as the last three searches become visible under the search box as you start typing in it. If the computer is shared by others, you might not want others to see your past searches. There is a way in which you can disable search history display in Windows 7. However, you cannot disable search history display in Windows 7 Home editions. This is due to the fact that you need to utilize the Group Policy Editor for achieving this goal and it is not available in the Home versions. Follow these steps to disable search history display in Windows 7.


Enter gpedit.msc in the search box of the Start menu. Press Enter. This will open the Local Group Policy Editor.


    Scroll down to User Configuration \ Administrative Templates \ Windows Components \ Windows Explorer.
    Double-click on Turn off display of recent search entries in the Windows Explorer search box on the right hand side of the dialog box.


     Select Enabled and click on the Apply button.
    Click on the OK button.
    Close out of the Group Policy Editor.


From now on, you won't be bothered by the display of recent search history as you start typing into the search box.

Windows 7 automatically saves all the recent searches done by the users. Some people are annoyed by this feature as the last three searches become visible under the search box as you start typing in it. If the computer is shared by others, you might not want others to see your past searches. There is a way in which you can disable search history display in Windows 7. However, you cannot disable search history display in Windows 7 Home editions. This is due to the fact that you need to utilize the Group Policy Editor for achieving this goal and it is not available in the Home versions. Follow these steps to disable search history display in Windows 7.


Enter gpedit.msc in the search box of the Start menu. Press Enter. This will open the Local Group Policy Editor.


    Scroll down to User Configuration \ Administrative Templates \ Windows Components \ Windows Explorer.
    Double-click on Turn off display of recent search entries in the Windows Explorer search box on the right hand side of the dialog box.


     Select Enabled and click on the Apply button.
    Click on the OK button.
    Close out of the Group Policy Editor.


From now on, you won't be bothered by the display of recent search history as you start typing into the search box.

Hide any file in image


how to hide any file behind the JPEG image manually that is without any software. Its a very easy trick and also very useful if you want to send information secretly to your friend. Also its different from stenography as it does hides text behind images or text behind mp3 files. Its universal, you can hide any file, virus or Trojan or anything behind image using this trick.

Things that you will need for this trick:
1. Winrar installed on your system.
2. Little knowledge of command prompt.


Steps :>
1. Create an folder into C drive (recommendation is that use this C:\Hidden).
    2. Now gather all files that you want to hide in this folder.
    3. Now add these all files to compressed .rar file using winrar (example myhiddenfiles.rar ). Note: This rar file should be in the same directory (i.e. C:\Hidden)
    4. Now Select the JPEG file that you want to use to hide the above content (say myimage.jpg). Put this image file also in the same folder that is in C:\Hidden
    5. Now, open Command Prompt (Go to Run and type "cmd"). Make your working directory C:\hidden. (When you open CMD you will get like C:\Documents and settings\username (something like this) Now type cd.. and press enter and then again type cd.. and press enter. Now you have something like this in cmd C:\ . Now in front of that type cd (Hidden) and press enter. )
    6. Now type: "COPY /b myimage.jpg + myhiddenfiles.rar outputimage.jpg" (without quotes) - Now, myimage.jpg is the picture you want to show, myhiddenfiles.rar is the file to be hidden, and outputimage.jpg is the file which contains both....
    7. Now, after you have done this, you will see a file output.jpg in C:\hidden. Open it (double-click) and it will show the picture you wanted to show. Now try opening the same file with WinRAR, it will show the hidden archive.


how to hide any file behind the JPEG image manually that is without any software. Its a very easy trick and also very useful if you want to send information secretly to your friend. Also its different from stenography as it does hides text behind images or text behind mp3 files. Its universal, you can hide any file, virus or Trojan or anything behind image using this trick.

Things that you will need for this trick:
1. Winrar installed on your system.
2. Little knowledge of command prompt.


Steps :>
1. Create an folder into C drive (recommendation is that use this C:\Hidden).
    2. Now gather all files that you want to hide in this folder.
    3. Now add these all files to compressed .rar file using winrar (example myhiddenfiles.rar ). Note: This rar file should be in the same directory (i.e. C:\Hidden)
    4. Now Select the JPEG file that you want to use to hide the above content (say myimage.jpg). Put this image file also in the same folder that is in C:\Hidden
    5. Now, open Command Prompt (Go to Run and type "cmd"). Make your working directory C:\hidden. (When you open CMD you will get like C:\Documents and settings\username (something like this) Now type cd.. and press enter and then again type cd.. and press enter. Now you have something like this in cmd C:\ . Now in front of that type cd (Hidden) and press enter. )
    6. Now type: "COPY /b myimage.jpg + myhiddenfiles.rar outputimage.jpg" (without quotes) - Now, myimage.jpg is the picture you want to show, myhiddenfiles.rar is the file to be hidden, and outputimage.jpg is the file which contains both....
    7. Now, after you have done this, you will see a file output.jpg in C:\hidden. Open it (double-click) and it will show the picture you wanted to show. Now try opening the same file with WinRAR, it will show the hidden archive.


Windows 8 Transformation Pack v7.0


For Vista and Windows 7 users, the changes will be largely superficial, with access to the Metro-like user interface and various gadgets the big attraction. XP users will notice the most radical changes, with a completely revamped interface to contend with. You may encounter glitches – if these prove too troublesome, or you decide the new look and feel isn’t for you, just re-run the setup tool to remove it from your system.

Windows 8 Transformation Pack v7.0 additions and new features:

-Added WinMetro as alternative Metro Start Screen
-Changed default Immersive UI to Metro Start Screen (Win Metro)
-Improved sounds scheme files handling method
-Updated Font installation code based on recent patch
-Updated Glass UI theme configuration based on hacked Aero Glass in Windows 8
-Updated Windows 8 Media sound scheme files and resources
-Updated Windows 8 visual style for Windows 7

so you can make similar look as windows 8 in windows xp and 7

File size-58.26 MB

download :>


For Vista and Windows 7 users, the changes will be largely superficial, with access to the Metro-like user interface and various gadgets the big attraction. XP users will notice the most radical changes, with a completely revamped interface to contend with. You may encounter glitches – if these prove too troublesome, or you decide the new look and feel isn’t for you, just re-run the setup tool to remove it from your system.

Windows 8 Transformation Pack v7.0 additions and new features:

-Added WinMetro as alternative Metro Start Screen
-Changed default Immersive UI to Metro Start Screen (Win Metro)
-Improved sounds scheme files handling method
-Updated Font installation code based on recent patch
-Updated Glass UI theme configuration based on hacked Aero Glass in Windows 8
-Updated Windows 8 Media sound scheme files and resources
-Updated Windows 8 visual style for Windows 7

so you can make similar look as windows 8 in windows xp and 7

File size-58.26 MB

download :>


Make your Computer Talk


Have you ever wondered how can you make your computer speak whatever you input to it like in the movies? Would it not be fun? If only it was possible! Rejoice, because now it is possible. Well, if you wish to know how to do this, then you have come to the right place. With this trick, you can create a script in Windows which will make your computer speak whatever you input to it.

To create one such talk script, follow the steps given below:-


Make your Computer Talk

Steps :>
Open Notepad.
Copy and paste the exact code given below.
          Dim Message, Speak
          Message=InputBox("Enter text","Speak")
          Set Speak=CreateObject("sapi.spvoice")
          Speak.Speak Message
    3. Click on File Menu, Save As, select All Types in Save as Type option, and save the file as Speak.vbs or "*.vbs".
    4.  Double click on the saved file, a window will open like the one in the image. Enter some text in enter text column and click OK.

Now your Computer will speak / talk what you typed in Step 4. Try it yourself.

Windows Compatibility: This VBS file can be executed on all versions of Windows including Windows XP, Windows Vista, Windows 7 and Windows 8.


Personal Experience: I personally showed this trick to many of my friends and they were literally left awestruck. You too can impress your friends by making your PC talk and be the Computer Wiz.

Have you ever wondered how can you make your computer speak whatever you input to it like in the movies? Would it not be fun? If only it was possible! Rejoice, because now it is possible. Well, if you wish to know how to do this, then you have come to the right place. With this trick, you can create a script in Windows which will make your computer speak whatever you input to it.

To create one such talk script, follow the steps given below:-


Make your Computer Talk

Steps :>
Open Notepad.
Copy and paste the exact code given below.
          Dim Message, Speak
          Message=InputBox("Enter text","Speak")
          Set Speak=CreateObject("sapi.spvoice")
          Speak.Speak Message
    3. Click on File Menu, Save As, select All Types in Save as Type option, and save the file as Speak.vbs or "*.vbs".
    4.  Double click on the saved file, a window will open like the one in the image. Enter some text in enter text column and click OK.

Now your Computer will speak / talk what you typed in Step 4. Try it yourself.

Windows Compatibility: This VBS file can be executed on all versions of Windows including Windows XP, Windows Vista, Windows 7 and Windows 8.


Personal Experience: I personally showed this trick to many of my friends and they were literally left awestruck. You too can impress your friends by making your PC talk and be the Computer Wiz.

Make your Computer Welcome You


Do you watch movies? Have you always loved the way how Computers in movies welcome their users by calling out their names? I bet that you too would want to know how you can achieve similar results on your PC and have a computer said welcome.

Then you are at the right place, this article describes exactly how you can make your computer welcome you like this.

With this trick, you can make your Computer welcome you in its computerized voice. You can make your Windows based computer say "Welcome to your PC, Username."


Make Windows Greet you with a Custom Voice Message at Startup

To use this trick, follow the instructions given below:-
1.     Click on Start. Navigate to All Programs, Accessories and Notepad.
2.    Copy and paste the exact code given below.
3.    Dim speaks, speech
4.    speaks="Welcome to your PC, Username"
5.    Set speech=CreateObject("sapi.spvoice")
6.    speech.Speak speaks
7.    Replace Username with your own name.
8.    Click on File Menu, Save As, select All Types in Save as Type option, and save the file as Welcome.vbs or "*.vbs".
9.    Copy the saved file.
10.  Navigate to C:\Documents and Settings\All Users\Start Menu\Programs\Startup (in Windows XP) and to C:\Users\ {User-Name}\AppData\Roaming\Microsoft\Windows\Start Menu\Programs\Startup (in Windows 8, Windows 7 and Windows Vista) if C: is your System drive. AppData is a hidden folder. So, you will need to select showing hidden folders in Folder options to locate it.
11.  Paste the file.


 Make your Computer Welcome you at startup

Now when the next time you start your computer, Windows will welcome you in its own computerized voice.


Note: For best results, it is recommended to change sound scheme to No Sounds.
1.     You can change the sound scheme to No Sounds by following the steps given below:-
2.    Go to Control Panel.
3.    Then click on Switch to Classic View.
4.    Then Click on Sounds and Audio Devices.
5.    Then Click on the Sounds Tab.
6.    Select No Sounds from the Sound Scheme option.
7.    If you wish to save your Previous Sound Scheme, you can save it by clicking Yes in the popup menu.
8.    Click on OK.
9.    Change Sound Scheme to No Sounds


Try it yourself to see how it works. In my personal opinion, this is an excellent trick. Whenever I start my PC in front of anybody and the PC welcomes me, the fellow is left wondering how brilliant a computer do I have.

Do you watch movies? Have you always loved the way how Computers in movies welcome their users by calling out their names? I bet that you too would want to know how you can achieve similar results on your PC and have a computer said welcome.

Then you are at the right place, this article describes exactly how you can make your computer welcome you like this.

With this trick, you can make your Computer welcome you in its computerized voice. You can make your Windows based computer say "Welcome to your PC, Username."


Make Windows Greet you with a Custom Voice Message at Startup

To use this trick, follow the instructions given below:-
1.     Click on Start. Navigate to All Programs, Accessories and Notepad.
2.    Copy and paste the exact code given below.
3.    Dim speaks, speech
4.    speaks="Welcome to your PC, Username"
5.    Set speech=CreateObject("sapi.spvoice")
6.    speech.Speak speaks
7.    Replace Username with your own name.
8.    Click on File Menu, Save As, select All Types in Save as Type option, and save the file as Welcome.vbs or "*.vbs".
9.    Copy the saved file.
10.  Navigate to C:\Documents and Settings\All Users\Start Menu\Programs\Startup (in Windows XP) and to C:\Users\ {User-Name}\AppData\Roaming\Microsoft\Windows\Start Menu\Programs\Startup (in Windows 8, Windows 7 and Windows Vista) if C: is your System drive. AppData is a hidden folder. So, you will need to select showing hidden folders in Folder options to locate it.
11.  Paste the file.


 Make your Computer Welcome you at startup

Now when the next time you start your computer, Windows will welcome you in its own computerized voice.


Note: For best results, it is recommended to change sound scheme to No Sounds.
1.     You can change the sound scheme to No Sounds by following the steps given below:-
2.    Go to Control Panel.
3.    Then click on Switch to Classic View.
4.    Then Click on Sounds and Audio Devices.
5.    Then Click on the Sounds Tab.
6.    Select No Sounds from the Sound Scheme option.
7.    If you wish to save your Previous Sound Scheme, you can save it by clicking Yes in the popup menu.
8.    Click on OK.
9.    Change Sound Scheme to No Sounds


Try it yourself to see how it works. In my personal opinion, this is an excellent trick. Whenever I start my PC in front of anybody and the PC welcomes me, the fellow is left wondering how brilliant a computer do I have.
Blogger Tips and TricksLatest Tips And TricksBlogger Tricks